Secure PHP Coding Tips – Hands On

Finding a list of what not to do when coding in PHP is easy enough, but what is often lacking are real world examples of how to remediate insecure code. Here are a few common insecure coding practices to watch out for in PHP code, and applicable ways you can fix them today.

  1. SQL Injection vulnerabilities: Be careful when using user input in SQL queries. Use prepared statements with bound parameters instead of concatenating user input with SQL statements.
  2. Cross-Site Scripting (XSS) vulnerabilities: Make sure to sanitize user input before displaying it on the website to prevent malicious scripts from running on the client’s browser.
  3. File inclusion vulnerabilities: Avoid using user-controlled input in file inclusion functions like require() or include(). Instead, use whitelists or restrict access to certain files and directories.
  4. Insecure session management: Ensure that session IDs are generated securely and are not vulnerable to session fixation attacks. Also, make sure to destroy session variables when they are no longer needed.
  5. Insecure password storage: Do not store passwords in plain text. Use secure hashing algorithms such as bcrypt to hash and salt passwords.
  6. Code injection vulnerabilities: Avoid using user-controlled input in eval() or similar functions that can execute arbitrary code.

These are just a few examples of insecure coding practices in PHP. Finding similar insecurities in your can take some coordinated planning, careful searches.

Generate Session IDs Securely to Prevent Session Fixation Attacks with PHP and Nginx

To ensure that session IDs are generated securely and are not vulnerable to session fixation attacks, you can follow these steps:

  1. Set the session cookie parameters:
session_set_cookie_params([
    'lifetime' => 0, // session cookie lifetime in seconds (0 = until browser is closed)
    'path' => '/', // path on the domain where the cookie will work
    'secure' => true, // send the cookie only over secure connections (HTTPS)
    'httponly' => true, // prevent JavaScript from accessing the session cookie
    'samesite' => 'Strict', // restricts the cookie to only be sent with "same-site" requests
]);

In this example, the session_set_cookie_params() function is used to set the session cookie parameters. The lifetime parameter is set to 0 to make the cookie a session cookie that will expire when the browser is closed. The path parameter is set to / to make the cookie available across the entire domain. The secure parameter is set to true to ensure that the cookie is only sent over secure connections (HTTPS). The httponly parameter is set to true to prevent JavaScript from accessing the session cookie. Finally, the samesite parameter is set to Strict to restrict the cookie to only be sent with “same-site” requests.

  1. Use a cryptographically secure random number generator to generate the session ID:
session_id(bin2hex(random_bytes(32))); // generate a session ID using random_bytes()

In this example, the session_id() function is used to generate the session ID using random_bytes() function, which generates a cryptographically secure random number of bytes.

  1. Regenerate the session ID periodically:
if (rand(1, 100) === 1) { // regenerate the session ID with a 1% chance
    session_regenerate_id(true); // regenerate the session ID and delete the old session data
}

In this example, the session_regenerate_id() function is used to regenerate the session ID with a 1% chance. The true parameter is passed to the function to delete the old session data.

By following these steps, you can ensure that session IDs are generated securely and are not vulnerable to session fixation attacks in your PHP application running on nginx web server.

Use “Approval Lists” (a.k.a whitelists) in PHP to Restrict Access to Specific Files and Directories

To restrict access to certain files and directories in PHP, you can use either an “approval” list (previously referred to as a “white list”) or an “exclude” (previously black list) approach. The terms have evolved, though the concepts have not. Here are some code samples for both approaches:

  1. Whitelist approach using $_GET or $_POST parameters:
// Define a whitelist of allowed pages
$allowedPages = ['home', 'about', 'contact'];

// Check if the requested page is in the whitelist
if (isset($_GET['page']) && in_array($_GET['page'], $allowedPages)) {
    // Include the requested page
    include($_GET['page'] . '.php');
} else {
    // Display an error message or redirect to a default page
    echo "Invalid page requested!";
}

In this example, a whitelist of allowed pages is defined using an array. The $_GET['page'] parameter is then checked to see if it is in the whitelist. If it is, the corresponding page is included using include(). If not, an error message is displayed or the user is redirected to a default page.

  1. Blacklist approach using .htaccess file:
// Create an .htaccess file in the directory you want to protect 
Deny from all

// Allow access to specific files or directories 
<FilesMatch "^(index\.php|css|js)"> 
    Allow from all 
</FilesMatch>

In this example, an .htaccess file is created in the directory you want to protect. The Deny from all directive prevents access to all files in the directory. The FilesMatch directive is then used to allow access to specific files or directories. In this case, access is allowed to the index.php file, as well as any files in the css and js directories.

By using either a whitelist or blacklist approach to restrict access to certain files and directories, you can help prevent unauthorized access to sensitive files and directories in your PHP application.

Preventing Cross-site Scripting by Sanitizing User Input

To sanitize user input before displaying it on a website and prevent cross-site scripting (XSS) attacks, you can use the PHP htmlspecialchars() function or the htmlentities() function. Here are a few examples using htmlspecialchars():

// Sanitize user input using htmlspecialchars() 
$username = htmlspecialchars($_POST['username'], ENT_QUOTES, 'UTF-8'); 
// Display the sanitized input on the website 
echo "Welcome, $username!";

In this example, the htmlspecialchars() function is used to sanitize the $_POST['username'] input. The second parameter (ENT_QUOTES) specifies that both single quotes and double quotes should be converted to their corresponding HTML entities. The third parameter specifies the character encoding used (in this case, UTF-8).

Similarly, here’s an example using htmlentities():

// Sanitize user input using htmlentities() 
$username = htmlentities($_POST['username'], ENT_QUOTES, 'UTF-8');
// Display the sanitized input on the website
echo "Welcome, $username!";

In this example, the htmlentities() function is used to sanitize the $_POST['username'] input. Like htmlspecialchars(), the second parameter (ENT_QUOTES) specifies that both single quotes and double quotes should be converted to their corresponding HTML entities, and the third parameter specifies the character encoding used.

By using one of these functions to sanitize user input before displaying it on a website, any potentially malicious code in the input will be converted to harmless characters and prevent XSS attacks.

Ways to Prevent SQL injections in PHP

Here are some PHP code samples demonstrating ways to prevent SQL injection attacks:

  1. Using Prepared Statements with Bound Parameters:

Prepared statements with bound parameters are the recommended approach to prevent SQL injection attacks. Here’s an example:

// Initialize a PDO instance
$pdo = new PDO('mysql:host=localhost;dbname=mydb', 'username', 'password');

// Prepare a SQL statement with placeholders
$stmt = $pdo->prepare('SELECT * FROM users WHERE username = :username');

// Bind values to the placeholders
$username = $_POST['username'];
$stmt->bindParam(':username', $username);

// Execute the statement
$stmt->execute();

// Fetch the results
$results = $stmt->fetchAll();

In this example, the SQL statement contains a placeholder :username instead of directly including the user input. The user input is then bound to this placeholder using the bindParam() method.

  1. Using mysqli_real_escape_string():

While prepared statements are recommended, mysqli_real_escape_string() can also be used to prevent SQL injection attacks:

// Initialize a mysqli instance
$conn = mysqli_connect('localhost', 'username', 'password', 'mydb');

// Escape user input using mysqli_real_escape_string()
$username = mysqli_real_escape_string($conn, $_POST['username']);

// Build and execute the SQL statement
$sql = "SELECT * FROM users WHERE username = '$username'";
$result = mysqli_query($conn, $sql);

// Fetch the results
$results = mysqli_fetch_all($result, MYSQLI_ASSOC);

In this example, the user input is escaped using the mysqli_real_escape_string() function before including it in the SQL statement.

It’s important to note that while escaping input can help prevent SQL injection attacks, it’s not a foolproof solution and can still leave your application vulnerable. Prepared statements with bound parameters are the recommended approach.

Errors installing Laminas MVC Skeleton

If you’re trying to start the basic Laminas skeleton application and the very first step of installation is failing, it would be fair to assume the project is going to be a mess moving forward. The good news is that moving past the PHP critical error is pretty easy.

PHP 7.4x, Composer 2.

The problem is during the initial step of installing the MVC Laminas framework using Composer 2 with PHP 7.4+.

composer create-project -s dev laminas/laminas-mvc-skeleton path/to/install

Generates the following error, which then produces a stack trace implicating OptionalPackagesInstaller.php as the culprit.:

PHP Fatal error: Uncaught TypeError: Argument 1 passed to Symfony\Component\Console\Question\Question::__construct() must be of the type string, array given, called in /usr/share/php/Composer/IO/ConsoleIO.php on line 273 and defined in /usr/share/php/Symfony/Component/Console/Question/Question.php:38

Fear not! The fix is surprisingly easy. You’ll be editing the following file in your project folder:

vendor/laminas/laminas-skeleton-installer/src/OptionalPackagesInstaller.php and correcting one mistake, the passing of an array instead of a string, in 2 different places:

  1. OptionalPackagesInstaller.php, Line 138: remove the opening bracket following the ‘=’ when setting the $question variable. Then, remove the closing bracket and the comma (around line 143).
  2. Same file, same concept: remove the brackets and unnecessary comma from the $question variable set in line 169.

Re-run composer install after saving the corrected file. It should now prompt you for the installation options.

If it throws any issues regarding the installation of PHP modules, review how you installed PHP initially and address each issue accordingly.

When WordPress Sitemap Generators Fail

Improving organic Google search results for your business’ WordPress-based website depends on ensuring that Google knows about every page, every post, every media item. To inform Google of your site’s content, we use “site maps” which are files that contain links to every aspect of your website. These sitemaps are submitted to Google so that it knows where to send its web “robots”.

Generating sitemap files can be quite involved if you attempt to do it manually, particularly if you have a lot of content on your site, such as products or a long history of posts. They are generally created in XML format, which

To overcome the challenge of manually creating sitemap files, plugins are available that will generate them for you. This can be an incredible time saver, though they are not without their own risks.

Installing a sitemap generator is no different than most WordPress plugins. Identify the one you wish to use, install it. Answer a few questions in the provided settings interface, such as whether to include or exclude static pages, posts, media, etc. You should also have the option of indicating how frequently your pages & posts are updated (hourly, daily, weekly, monthly, yearly).

Submitting the index file to Google is also quite straightforward providing you’re familiar with validating your website with the Google Webmasters service. You may need to place a simple text file on your website or add a small entry to your DNS records to prove to Google that you are an authorized agent of the website.

Once your sitemap has been submitted to Google Webmasters, Google will test the links and crawl your site over time with its Googlebot spider service. Googlebot will capture your website content and determine how useful it will be to the general Internet population in their searches. The more relevant your content is, the higher up in the organic search results your site will appear.

When all of the moving parts are functioning perfectly, it can be great for your search results and your business. But how do you know that everything is working correctly?

Google Webmasters will inform you of issues with your site. It will indicate errors with how it crawled your content and provide some relatively cryptic explanation of what needs to be repaired. It will show you what pages it has indexed, how frequently it returns to detect changes and any recommendations for improvement.

Listen to Google Webmasters, particularly in regards to sitemaps. This morning we received an email from one of our valued past customers who received notice from Google:

“Hey guys… I just got an email from Google saying that a new issue was found, ‘Submitted URL marked noindex.’  I promise we haven’t changed anything, just staying on top of our updates like you said we should.”

Therein lies the problem: something changed not in the site’s content, but likely within the plugin that was managing their sitemaps. While installing updates on a regular basis is a good practice, they are still at risk of programming bugs, conflicts and unintended consequences of changes.

While digging through the Webmaster results and testing the sitemaps, we discovered that a recent update to the plugin added ‘noindex’ to the site’s dynamically generated robots.txt file by default! Gasp! This is essentially telling Google, “Here are all of my links….just go ahead and ignore them.”

It appeared that many users of the plugin were encountering the same issue. This is a widely used plugin, too. We also discovered that deeper links were now incorrectly formatted in XML and were considered invalid by the hundreds.

Quick response to remove the offending plugin, identify and test a few replacement options and resubmitting the rebuilt index file should repair any damage. But it required prompt action and a deep familiarity with how search engines work to mitigate any damage.

Lesson: stay on top of your updates and review every message from Google Webmasters the moment it arrives. Search for a fix, but if you tread into unfamiliar territory, don’t hesitate to contact your site administrator… or us. We’re happy to help.

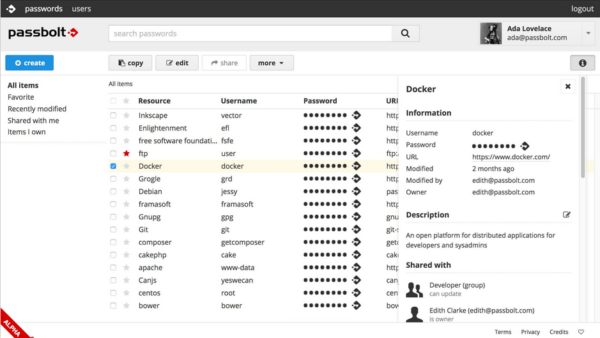
 

Passbolt Installation and Hosting

Passbolt is a free and open-source secure password manager for your team. It allows you to assign managers to groups, and individuals to groups who should – or should not – have access to a variety of account logins.

If your current password management tool is a spreadsheet sitting on someone’s computer or – worse – taped to your wall, you need Passbolt in your company.

Stop scrambling to update all of your accounts after an employee has quit or is terminated. Limit what they know and when they can know it, then protect those assets with mitigated risk!

Passbolt Secure Password Manager
Passbolt

Installation can be a little tricky at times, particularly if you’re hosting on cloud/shared servers.

We can help with installation, hosting, configuring and implementing Passbolt within your company.